
This guide might also work on any screen that we use for building our Game Boy Zero as long it uses the CL6201 LED driver IC with the “7001” label on it.
I will be using a Raspberry Pi Zero for this tutorial but any Arduino/Atmel chips with PWM pins can also be programmed to do the job. I have actually tested it with an attiny13a and it works just fine.
Hardware
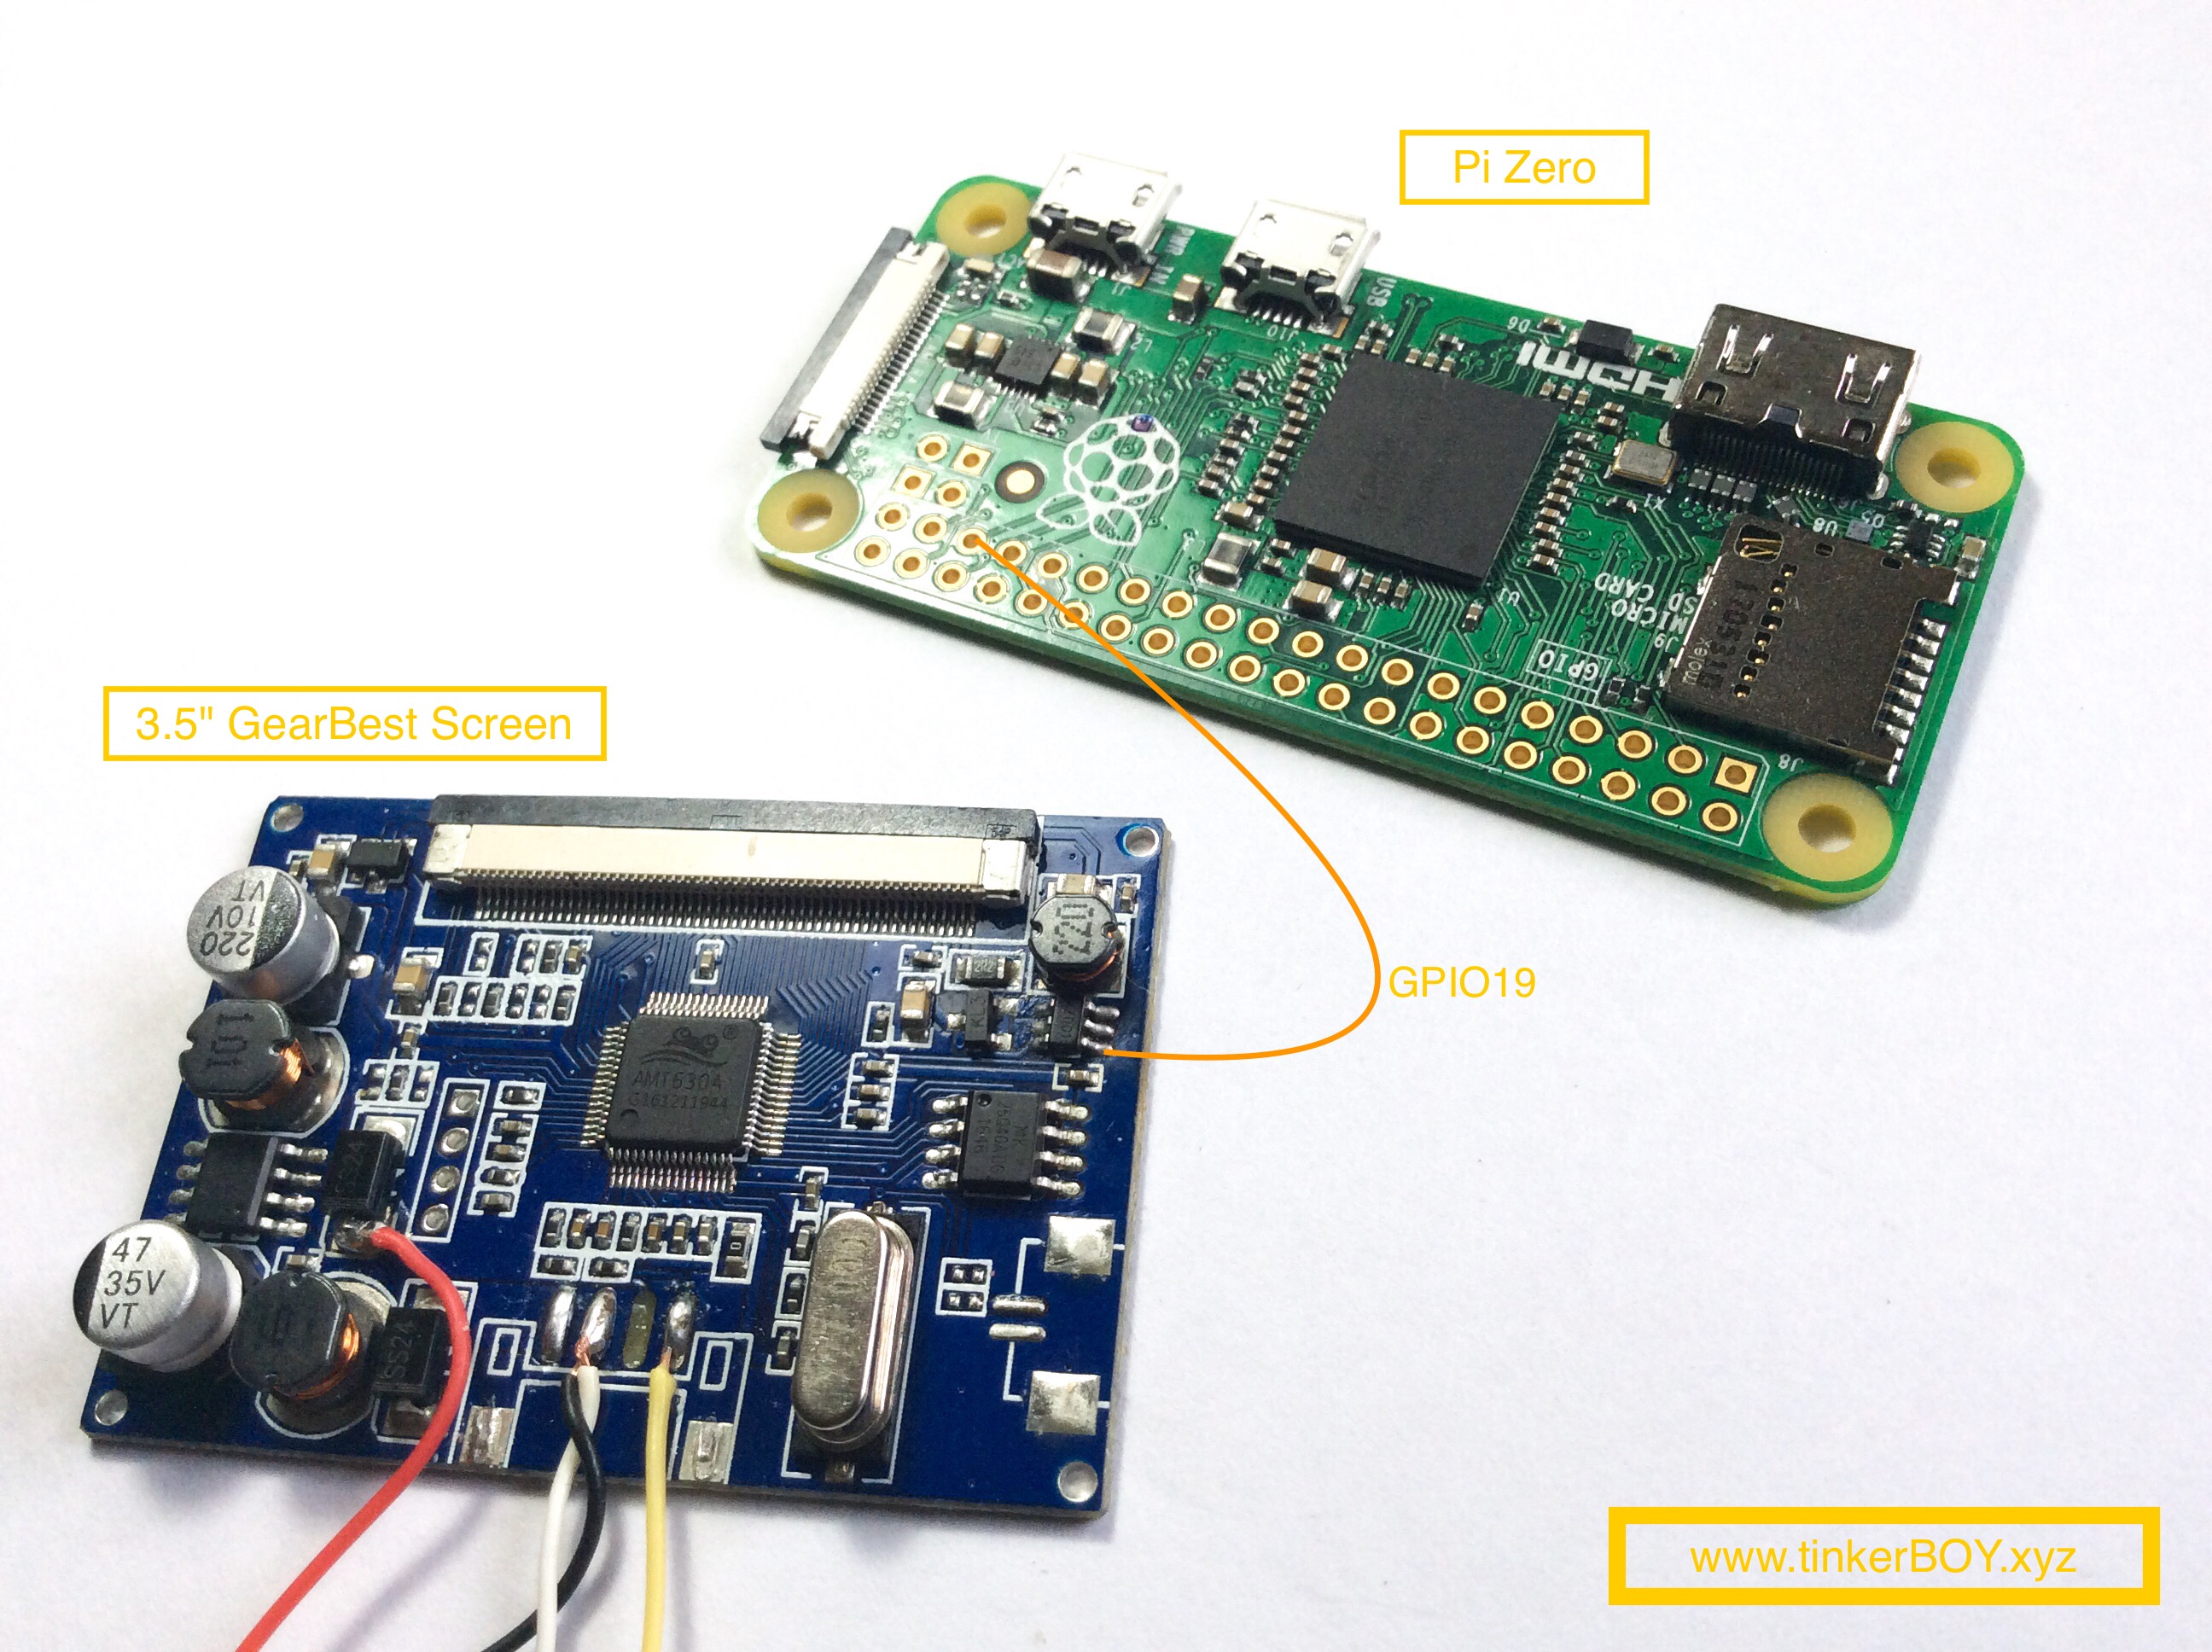
Before we start, follow the Wiring Guide for the 3.5″ GearBest Screen with 5V Mod. Then start by soldering a wire from the CL6201’s EN pin 4 to the Pi Zero’s GPIO19 pin. The CL6201 Datasheet says that the EN pin can be used to adjust the brightness by connecting it with a PWM square wave signal between 100Hz and 100KHz. That means with the Raspberry Pi’s capability to produce PWM signal we can control the brightness with it.
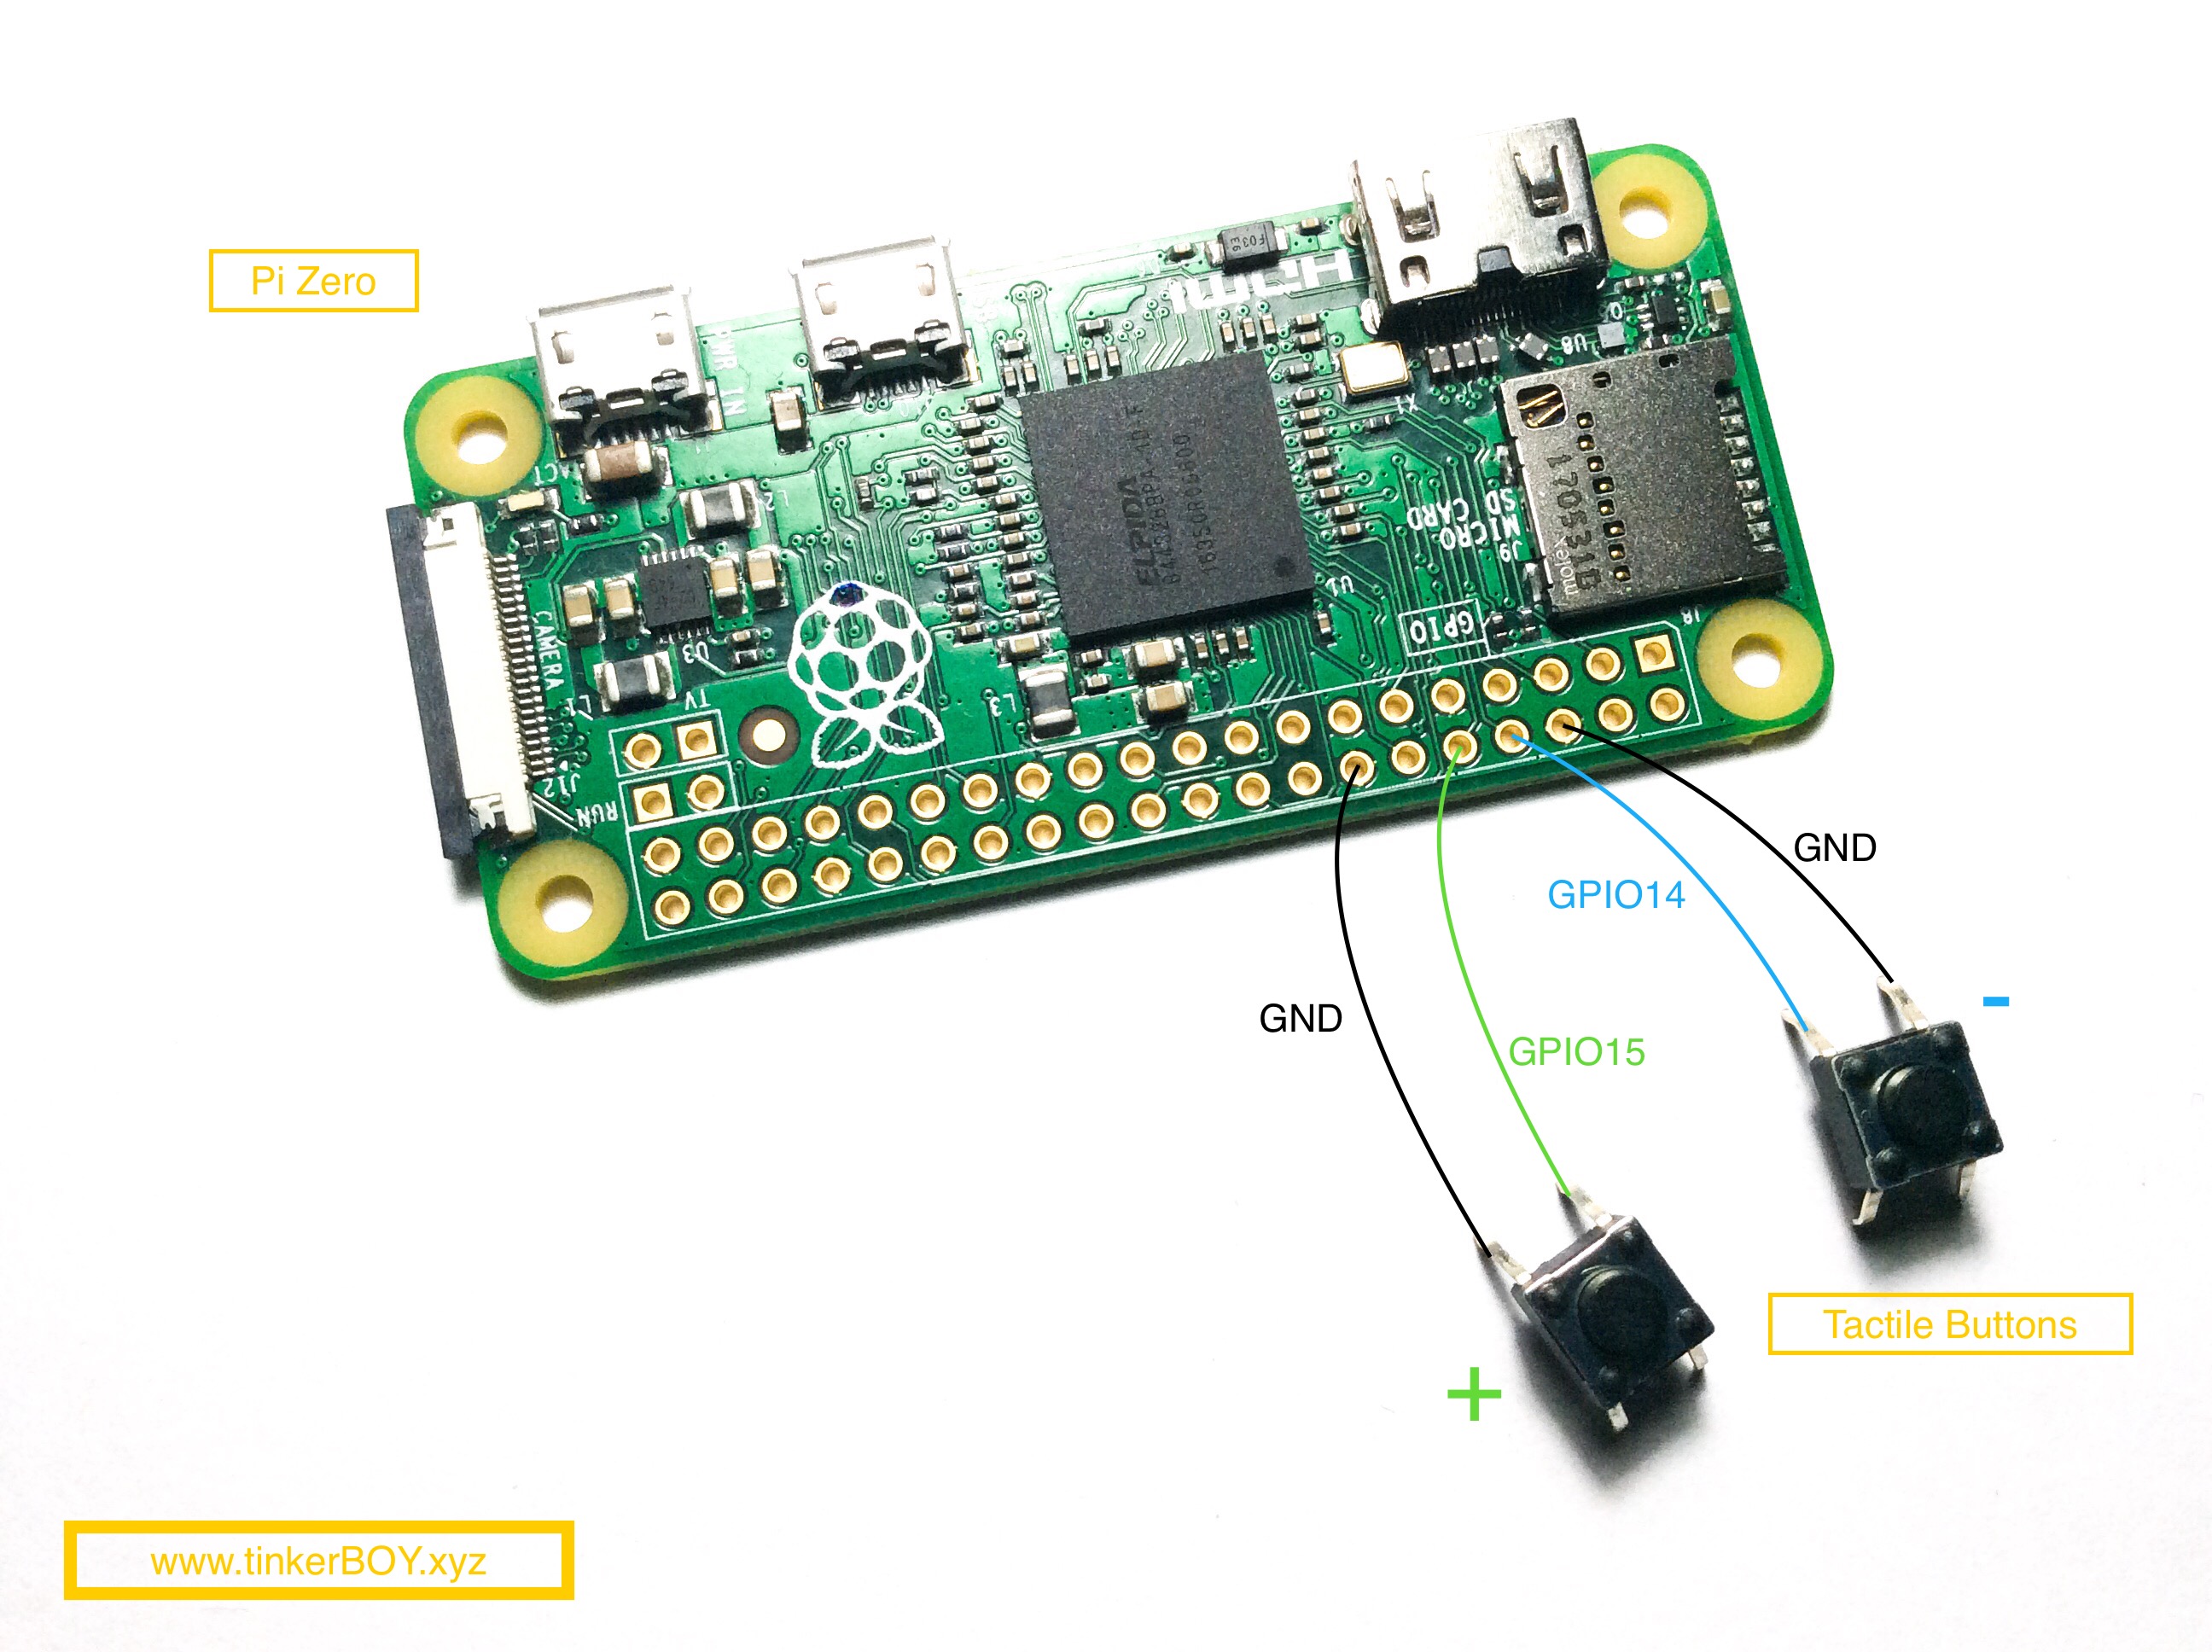
For the control buttons let’s use two tactile buttons for increasing and decreasing the brightness. Wire the buttons like this:
Software
You can write a program in Python or C to do the PWM routine but let’s keep it simple by using a progam called pigpio and write a simple python to just call it. Login to your Raspberry Pi and install the program by following the instruction at abyz.me.uk/rpi/pigpio/download.html.
Testing
We are now ready to test the program. Type the command sudo pigpiod to load the pigpio daemon. Now we can test it with the following command format:
pigs p GPIO DUTYCYCLE(0-255)
GPIO is the gpio pin we want to use which is GPIO19 and DUTYCYCLE is what controls the brightness.
Example:
pigs p 19 50
The above code should dim the screen. Try experimenting with other DUTYCYCLE values from 0-255.
Now for the actual buttons to control the brightness I wrote a simple python to call the pigpio program. Copy the code below and paste to a new file with .py extension. You can just name it as brightness_controller.py if you want.
import RPi.GPIO as GPIO

import subprocess
import time

dutycycle = 255
GPIO.setmode(GPIO.BCM)
BTTN_DIM = 15
BTTN_BRIGHT = 16
PWM_PIN = 19

GPIO.setwarnings(False)

GPIO.setup(BTTN_DIM, GPIO.IN, pull_up_down=GPIO.PUD_UP)
GPIO.setup(BTTN_BRIGHT, GPIO.IN, pull_up_down=GPIO.PUD_UP)
cmd = "pigs p 19 " + str(dutycycle)
subprocess.call(cmd, shell=True)

def btn_func(a):
   global dutycycle
   global cmd

   if a == 1:
      dutycycle = dutycycle + 25
   else:
      dutycycle = dutycycle - 25

   cmd = "pigs p 19 " + str(dutycycle)
   subprocess.call(cmd, shell=True)


GPIO.add_event_detect(BTTN_DIM, GPIO.FALLING, callback=lambda x: btn_func(0), bouncetime=300)
GPIO.add_event_detect(BTTN_BRIGHT, GPIO.FALLING, callback=lambda x: btn_func(1), bouncetime=300)

while 1:
   time.sleep(10)
Run it by typing the command python brightness_controller.py. Press each of the buttons and it should increase or decrease the brightness on the screen.
Here’s a demo:
That’s it! Let me know in the comment below if this works for you.
Hey,
It’s working with the test “pigs p 19 50”. But where should i save the python brightness_controller.py file?
Thanks in advance and keep on the good job.
F
Found it, i’m a newbie so this is al in the basics….
Care to share the solution for the rest of us newbies?
Is there a way to do this using software controls to brighten or darken the screen after doing this mod? Instead of physical switches?
Yes sure you can do it without any physical switches too.
Tinkerboy,
Are the tactile switches the same L and R buttons or do I have to add more tactile switches to the gameboy zero? New to this so I feel like I’m missing something here…
You need to add another tactile switch. One switch will do.
How would you do this with a potentiometer (like the volume wheel)?
Do you know if it just need a pulse or a constant square wave? Thinking it might be tidier to have a micro-controller take care of the screen dimming. The one I have can only do short bursts
Yes it’s better with a constant square wave. You can do that with Raspberry Pi hardware PWM or you can use a small avr chip like attiny13.
Cheers for the swift reply. I’m using a picaxe (only because it uses basic and I vaguely remember that from my zx spectrum). I feel like it should work, since it can dim an led with pwm no problem, but I’ve read it cant. I have it all set up here anyway, so I’ll see what it does.
Kinda confused on where to put the python script we wrote?
works fine using the ‘pigs p 19 50’ command in SSH, but after I made the ‘brightness_controller.py’ script, I placed it into the boot directory since I couldn’t see any obvious place to put it. And it didnt seem to launch the script.
So what am I missing? thanks in advance
Put the script in
/home/pi. And if you want to run it all the time when Pi starts, edit the file/etc/rc.localand place copy the line beforeexit.python /home/pi/brightness_controller.py &